Nissan Ariya: Child restraints
- Precautions on child restraints
- Rear-facing child restraint installation using LATCH
- Rear-facing child restraint installation using the seat belts
- Forward-facing child restraint installation using LATCH
- Forward-facing child restraint installation using the seat belts
- Booster seats
Precautions on child restraints
WARNING
- Failure to follow the warnings and
instructions for proper use and
installation of child restraints
could result in serious injury or
death of a child or other passengers
in a sudden stop or collision:
- The child restraint must be used and installed properly. Always follow all of the child restraint manufacturer's instructions for installation and use.
- Infants and children should
never be held on anyone's lap.
Even the strongest adult cannot resist the forces of a collision.
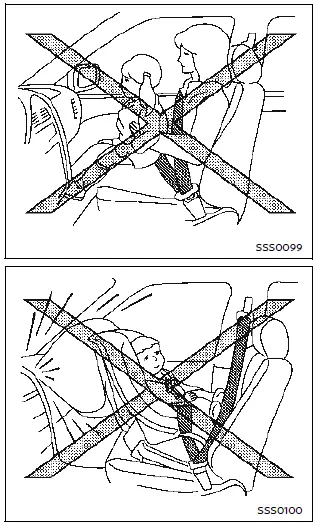
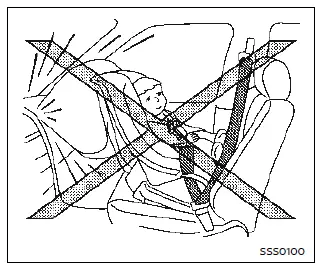
- Do not put a seat belt around both a child and another passenger.
- NISSAN recommends that all child restraints be installed in the rear seat. Studies show that children are safer when properly restrained in the rear seat than in the front seat. If you must install a forward-facing child restraint in the front seat, see "Forward-facing child restraint installation using the seat belts".
- Even with the NISSAN Advanced Air Bag System, never install a rear-facing child restraint in the front seat. An inflating air bag could seriously injure or kill a child. A rear-facing child restraint must only be used in the rear seat.
- Be sure to purchase a child restraint that will fit the child and vehicle. Some child restraints may not fit properly in your vehicle.
- Child restraint anchorages are
designed to withstand only
those loads imposed by
correctly fitted child restraints.
Under no circumstances are they to be used to attach adult seat belts, or other items or equipment to the vehicle. Doing so could damage the child restraint anchorages. The child restraint will not be properly installed using the damaged anchorage, and a child could be seriously injured or killed in a collision.
- Never use the anchor points for adult seat belts or harnesses.
- A child restraint with a top tether strap should not be used in the front passenger seat.
- Keep seatbacks as upright as possible after fitting the child restraint.
- Infants and children should always be placed in an appropriate child restraint while in the vehicle.
- When the child restraint is not in use, keep it secured with the LATCH system or a seat belt. In a sudden stop or collision, loose objects can injure occupants or damage the vehicle.
CAUTION
A child restraint in a closed vehicle can become very hot. Check the seating surface and buckles before placing a child in the child restraint.
This vehicle is equipped with a universal child restraint anchor system, referred to as the LATCH (Lower Anchors and Tethers for CHildren) system. Some child restraints include rigid or webbing-mounted attachments that can be connected to these anchors.
For details, see "Lower Anchors and Tethers for CHildren (LATCH) system".
If you do not have a LATCH compatible child restraint, the vehicle seat belts can be used.
Several manufacturers offer child restraints for infants and small children of various sizes. When selecting any child restraint, keep the following points in mind:
- Choose only a restraint with a label certifying that it complies with Federal Motor Vehicle Safety Standard 213 or Canadian Motor Vehicle Safety Standard 213.
- Check the child restraint in your vehicle to be sure it is compatible with the vehicle's seat and seat belt system.
- If the child restraint is compatible with
your vehicle, place your child in the
child restraint and check the various
adjustments to be sure the child
restraint is compatible with your child.
Choose a child restraint that is designed for your child's height and weight. Always follow all recommended procedures.
- If the combined weight of the child and child restraint is less than 65 lbs (29.5 kg), you may use either the LATCH anchors or the seat belt to install the child restraint (not both at the same time).
- If the combined weight of the child and child restraint is greater than 65 lbs (29.5 kg), use the vehicle's seat belt (not the lower anchors) to install the child restraint.
- Be sure to follow the child restraint manufacturer's instructions for installation.
All U.S. states and Canadian provinces or territories require that infants and small children be restrained in an approved child restraint at all times while the vehicle is being operated.
Canadian law requires the top tether strap on forward-facing child restraints be secured to the designated anchor point on the vehicle.
Lower Anchors and Tethers for CHildren (LATCH) system
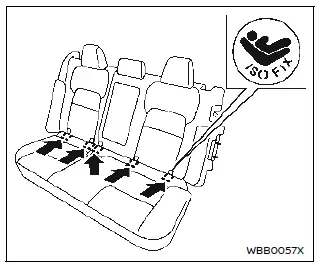
LATCH system anchor location
Basic information
Your vehicle is equipped with special anchor points that are used with LATCH system compatible child restraints. This system may also be referred to as the ISOFIX or ISOFIX compatible system. With this system, you do not have to use a vehicle seat belt to secure the child restraint unless the combined weight of the child and child restraint exceeds 65 lbs (29.5 kg). If the combined weight of the child and child restraint is greater than 65 lbs (29.5 kg), use the vehicle's seat belt (not the lower anchors) to install the child restraint. Be sure to follow the child restraint manufacturer's instructions for installation.
The LATCH anchor points can be used to install child restraints in the rear outboard seating positions.
LATCH lower anchor
WARNING
Failure to follow the warnings and instructions for proper use and installation of child restraints could result in serious injury or death of a child or other passengers in a sudden stop or collision:
- Only attach LATCH system
compatible child restraints to the
Lower Anchors shown in the illustration.
For additional information, refer to the following sections of this Owner's Manual for installation guidance.
- Attach LATCH system compatible child restraints only at the locations shown in the illustration.
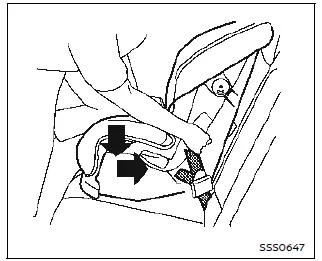
- Inspect the lower anchors by
inserting your fingers into the
lower anchor area. Feel to make
sure there are no obstructions
over the anchors such as seat belt
webbing or seat cushion material.
The child restraint will not be secured properly if the lower anchors are obstructed.
- Child restraint anchorages are
designed to withstand only those
loads imposed by correctly fitted
child restraints. Under no circumstances
are they to be used to
attach adult seat belts, or other
items or equipment to the vehicle.
Doing so could damage the child restraint anchorages. The child restraint will not be properly installed using the damaged anchorage, and a child could be seriously injured or killed in a collision.
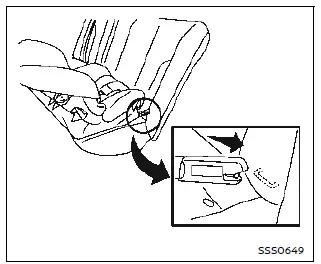
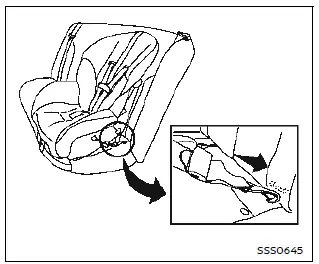
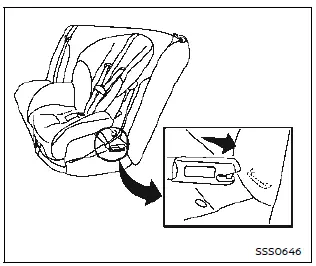
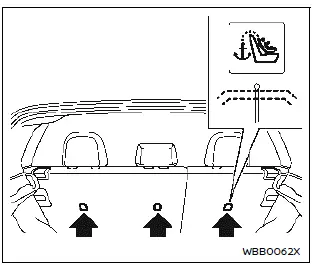
LATCH lower anchor location
The LATCH lower anchor points are provided to install child restraints in the rear seats. Do not attempt to install child restraints in the center and left outboard seating positions simultaneously using the LATCH lower anchors.
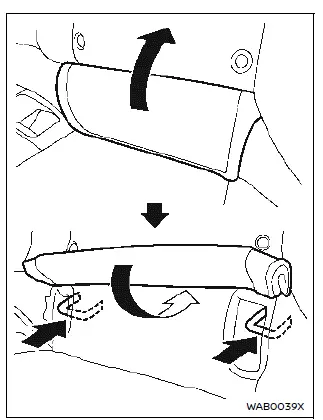
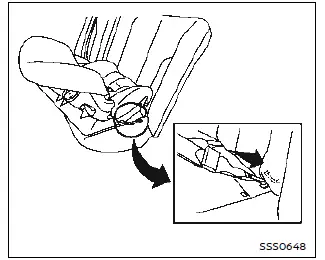
LATCH lower anchor cover removal (example)
The LATCH lower anchors are located behind the cover. Flip and fold the cover, and fix it with the hook-and-loop fastener as shown. A label is attached to the seatback to help you locate the LATCH lower anchors.

LATCH in the center rear seating position
A 5th LATCH anchor can be found between the outboard LATCH anchor pairs. It is specifically designed to be used together with the inboard LATCH anchor on the driver's side, in order to install a CRS in the rear center seating position.
These anchors utilize standard LATCH anchor spacing, of 11.02 in (280mm).
WARNING
Never attach two CRS attachments to the same LATCH anchor. This may overload the anchor in a collision, which could increase the risk of the occupant's serious injury or death.
When installing the CRS in the center rear seating position with the inboard LATCH anchors, be careful to ensure any occupant or CRS in the outboard seating positions is properly restrained using the vehicle seat belt and there is no interference with the center CRS installation. If the outboard occupants cannot be properly restrained, consider using the vehicle seat belt to restrain the CRS in the center seating position, or moving the CRS to another position instead.
When installing a CRS in the center seating position, use the seat back recline feature to align the left and right sides of the seat back, creating one evenly reclined surface. Never install a CRS in the center seating position when one part of the seat back is further reclined than the other. This may create an unstable surface on which to install the CRS.
Failure to evenly recline the seat backs before CRS installation could increase the risk of the occupant's serious injury or death. Remember to re-check that the CRS is properly installed any time the seats are reclined or adjusted.
OK (the seatback recline is aligned)
Not OK (the seatback recline is not aligned)
LATCH webbing-mounted attachment
Installing child restraint LATCH lower anchor attachments
LATCH compatible child restraints include two rigid or webbing-mounted attachments that can be connected to two anchors located at certain seating positions in your vehicle. With this system, you do not have to use a vehicle seat belt to secure the child restraint. Check your child restraint for a label stating that it is compatible with LATCH. This information may also be in the instructions provided by the child restraint manufacturer.
LATCH rigid-mounted attachment
When installing a child restraint, carefully read and follow the instructions in this manual and those supplied with the child restraint.
Top tether anchor
WARNING
Properly secure cargo and do not allow it to contact the top tether strap when it is attached to the top tether anchor. Cargo that is not properly secured or cargo that contacts the top tether strap may damage the top tether strap during a collision. Your child could be seriously injured or killed in a collision if the child restraint top tether strap is damaged.
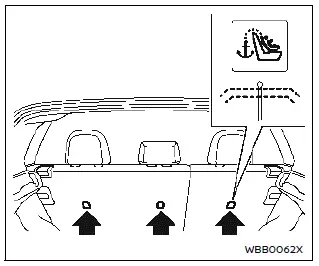
Top tether anchor point locations
WARNING
Child restraint anchorages are designed to withstand only those loads imposed by correctly fitted child restraints. Under no circumstances are they to be used to attach adult seat belts, or other items or equipment to the vehicle. Doing so could damage the child restraint anchorages. The child restraint will not be properly installed using the damaged anchorage, and a child could be seriously injured or killed in a collision.
Anchor points are located on the back side of the seatbacks.
If a child restraint has a top tether strap, it must be used when installing with the LATCH lower anchor attachments or seat belts as instructed by the child restraint manufacturer.
If you have any questions when installing a top tether strap child restraint on the rear seat, it is recommended you visit a NISSAN certified ARIYA dealer for this service.
Rear-facing child restraint installation using LATCH
For additional information, refer to all Warnings and Cautions in the "Child safety" and "Child restraints" sections before installing a child restraint.
Do not use the lower anchors if the combined weight of the child and the child restraint exceeds 65 lbs (29.5 kg). If the combined weight of the child and the child restraint is greater than 65 lbs (29.5 kg), use the vehicle's seat belt (not the lower anchors) to install the child restraint. Be sure to follow the child restraint manufacturer's instructions for installation.
Follow these steps to install a rear-facing child restraint using the LATCH system:
1. Position the child restraint on the seat.
Always follow the child restraint manufacturer's instructions.
Rear-facing web-mounted - step 2
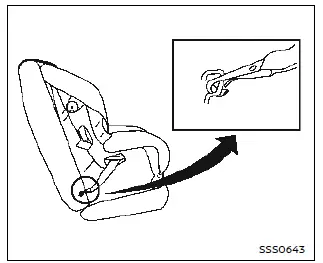
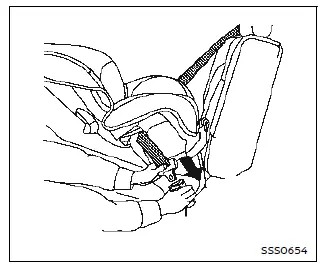
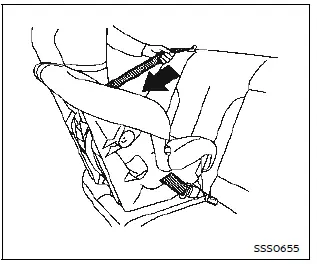
2. Secure the child restraint anchor attachments to the LATCH lower anchors. Check to make sure the LATCH attachment is properly attached to the lower anchors.
Rear-facing rigid-mounted - step 2
Rear-facing - step 3
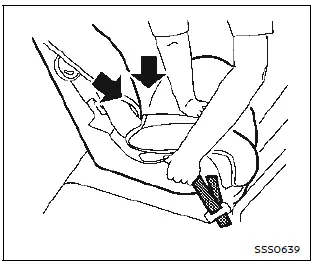
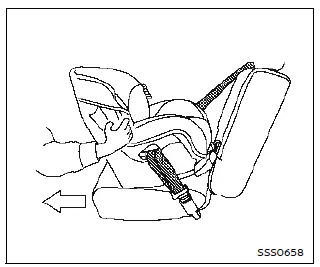
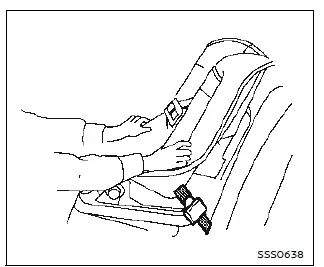
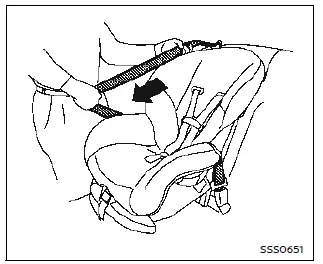
3. For child restraints that are equipped with webbing-mounted attachments, remove any additional slack from the anchor attachments. Press downward and rearward firmly in the center of the child restraint with your hand to compress the vehicle seat cushion and seatback while tightening the webbing of the anchor attachments.
Rear-facing - step 4
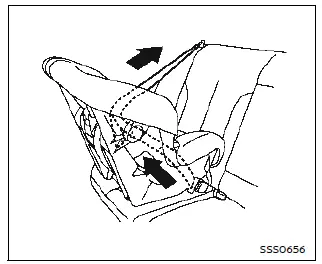
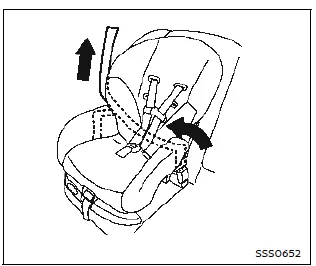
4. After attaching the child restraint, test it before you place the child in it. Push it from side to side while holding the child restraint near the LATCH attachment path. The child restraint should not move more than 1 inch (25 mm), from side to side. Try to tug it forward and check to see if the LATCH attachment holds the restraint in place. If the restraint is not secure, tighten the LATCH attachment as necessary, or put the restraint in another seat and test it again. You may need to try a different child restraint or try installing by using the vehicle seat belt (if applicable).
Not all child restraints fit in all types of vehicles.
5. Check to make sure the child restraint is properly secured prior to each use. If the child restraint is loose, repeat steps 1 through 4.
Rear-facing child restraint installation using the seat belts
WARNING
The three-point seat belt with Automatic Locking Retractor (ALR) must be used when installing a child restraint. Failure to use the ALR mode will result in the child restraint not being properly secured. The restraint could tip over or be loose and cause injury to a child in a sudden stop or collision.
For additional information, refer to all Warnings and Cautions in the "Child safety" and "Child restraints" sections before installing a child restraint.
Do not use the lower anchors if the combined weight of the child and the child restraint exceeds 65 lbs (29.5 kg). If the combined weight of the child and the child restraint is greater than 65 lbs (29.5 kg), use the vehicle's seat belt (not the lower anchors) to install the child restraint. Be sure to follow the child restraint manufacturer's instructions for installation.
Follow these steps to install a rear-facing child restraint using the vehicle seat belts in the rear seats:
Rear-facing - step 1
1. Child restraints for infants must be used in the rear-facing direction and therefore must not be used in the front seat. Position the child restraint on the seat. Always follow the restraint manufacturer's instructions.
Rear-facing - step 2
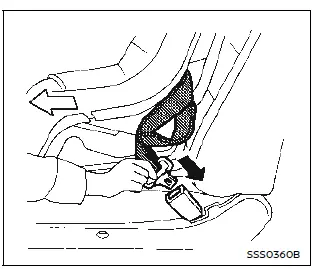
2. Route the seat belt tongue through the child restraint and insert it into the buckle until you hear and feel the latch engage. Be sure to follow the child restraint manufacturer's instructions for belt routing.
Rear-facing - step 3
3. Pull the shoulder belt until the belt is fully extended. At this time, the seat belt retractor is in the Automatic Locking Retractor (ALR) mode (child restraint mode). It reverts to the Emergency Locking Retractor (ELR) mode when the seat belt is fully retracted.
Rear-facing - step 4
4. Allow the seat belt to retract. Pull up on the shoulder belt to remove any slack in the belt.

Rear-facing - step 5
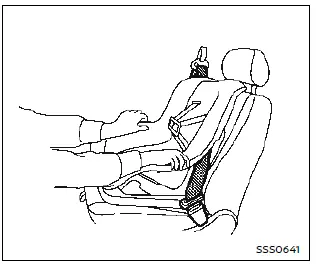
5. Remove any additional slack from the seat belt; press downward and rearward firmly in the center of the child restraint to compress the vehicle seat cushion and seatback while pulling up on the seat belt.
Rear-facing - step 6
6. After attaching the child restraint, test it before you place the child in it. Push it from side to side while holding the child restraint near the seat belt path.
The child restraint should not move more than 1 inch (25 mm), from side to side. Try to tug it forward and check to see if the belt holds the restraint in place. If the restraint is not secure, tighten the seat belt as necessary, or put the restraint in another seat and test it again. You may need to try a different child restraint. Not all child restraints fit in all types of vehicles.
7. Check to make sure that the child restraint is properly secured prior to each use. If the seat belt is not locked, repeat steps 1 through 6.
After the child restraint is removed and the seat belt fully retracted, the ALR mode (child restraint mode) is canceled.
Forward-facing child restraint installation using LATCH
Basic information
For additional information, refer to all Warnings and Cautions in the "Child safety" and "Child restraints" sections before installing a child restraint.
Do not use the lower anchors if the combined weight of the child and the child restraint exceeds 65 lbs (29.5 kg). If the combined weight of the child and the child restraint is greater than 65 lbs (29.5 kg), use the vehicle's seat belt (not the lower anchors) to install the child restraint. Be sure to follow the child restraint manufacturer's instructions for installation.
Follow these steps to install a forward-facing child restraint using the LATCH system:
1. Position the child restraint on the seat.
Always follow the child restraint manufacturer's instructions.
Forward-facing web-mounted - step 2
2. Secure the child restraint anchor attachments to the LATCH lower anchors. Check to make sure the LATCH attachment is properly attached to the lower anchors.
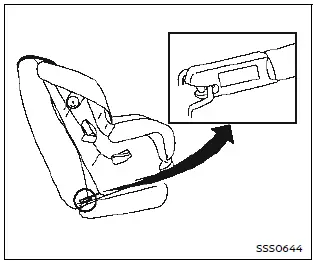
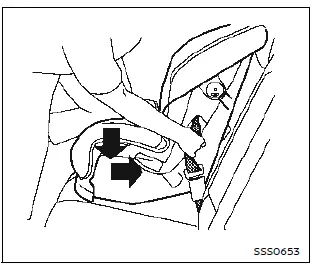
If the child restraint is equipped with a top tether strap, route the top tether strap and secure the tether strap to the tether anchor point. See "Installing top tether strap". Do not install child restraints that require the use of a top tether strap in seating positions that do not have a top tether anchor.
Forward-facing rigid-mounted - step 2
3. The back of the child restraint should be secured against the vehicle seatback.
If necessary, adjust or remove the head restraint/headrest to obtain the correct child restraint fit. If the head restraint/headrest is removed, store it in a secure place. Be sure to reinstall the head restraint/headrest when the child restraint is removed. See "Head restraints/headrests" for head restraint/headrest adjustment information.
If the seating position does not have an adjustable head restraint/headrest and it is interfering with the proper child restraint fit, try another seating position or a different child restraint.
Forward-facing - step 4
4. For child restraints that are equipped with webbing-mounted attachments, remove any additional slack from the anchor attachments. Press downward and rearward firmly in the center of the child restraint with your knee to compress the vehicle seat cushion and seatback while tightening the webbing of the anchor attachments.
5. Tighten the tether strap according to the manufacturer's instructions to remove any slack.
Forward-facing - step 6
6. After attaching the child restraint, test it before you place the child in it. Push it from side to side while holding the child restraint near the LATCH attachment path. The child restraint should not move more than 1 inch (25 mm), from side to side. Try to tug it forward and check to see if the LATCH attachment holds the restraint in place. If the restraint is not secure, tighten the LATCH attachment as necessary, or put the restraint in another seat and test it again. You may need to try a different child restraint. Not all child restraints fit in all types of vehicles.
7. Check to make sure the child restraint is properly secured prior to each use. If the child restraint is loose, repeat steps 1 through 6.
Installing top tether strap
WARNING
- Child restraint anchorages are
designed to withstand only those
loads imposed by correctly fitted
child restraints. Under no circumstances
are they to be used to
attach adult seat belts, or other
items or equipment to the vehicle.
Doing so could damage the child restraint anchorages. The child restraint will not be properly installed using the damaged anchorage, and a child could be seriously injured or killed in a collision.
- Do not hook the top tether strap on the seatback carpet. Be sure to use the tether anchor point to secure the top tether strap.
The child restraint top tether strap must be used when installing forward-facing child restraint with the LATCH lower anchor attachments.
First, secure the child restraint with the LATCH lower anchors.
1. Remove the head restraint/headrest and store it in a secure place. Be sure to reinstall the head restraint/headrest when the child restraint is removed.
See "Head restraints/headrests" for head restraint/headrest adjustment, removal and installation information.
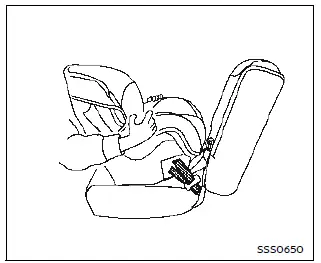
2. Position the top tether strap as shown.
3. Secure the top tether strap to the tether anchor point as shown.
4. Refer to the appropriate child restraint installation procedure steps in this section before tightening the tether strap.
If you have any questions when installing a top tether strap, it is recommended that you visit a NISSAN certified ARIYA dealer for this service.
Forward-facing child restraint installation using the seat belts
Basic information
WARNING
The three-point seat belt with Automatic Locking Retractor (ALR) must be used when installing a child restraint. Failure to use the ALR mode will result in the child restraint not being properly secured. The restraint could tip over or be loose and cause injury to a child in a sudden stop or collision. Also, it can change the operation of the front passenger air bag.
See "Front passenger air bag and status light".
For additional information, refer to all Warnings and Cautions in the "Child safety" and "Child restraints" sections before installing a child restraint.
Do not use the lower anchors if the combined weight of the child and the child restraint exceeds 65 lbs (29.5 kg). If the combined weight of the child and the child restraint is greater than 65 lbs (29.5 kg), use the vehicle's seat belt (not the lower anchors) to install the child restraint. Be sure to follow the child restraint manufacturer's instructions for installation.
Follow these steps to install a forward-facing child restraint using the vehicle seat belt in the rear seats or in the front passenger seat:
Forward-facing (front passenger seat) - step 1
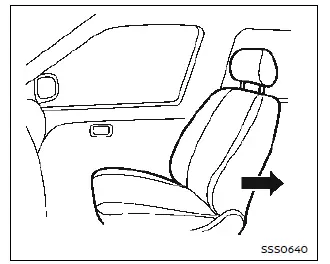
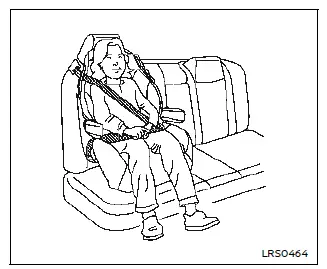
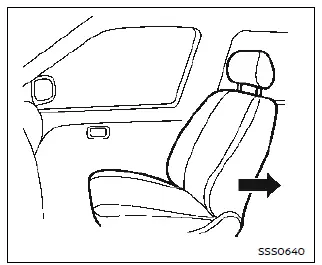
1. If you must install a child restraint in the front seat, it should be placed in a forward-facing direction only. Move the seat to the rearmost position.
Child restraints for infants must be used in the rear-facing direction and, therefore, must not be used in the front seat.
2. Position the child restraint on the seat.
Always follow the child restraint manufacturer's instructions.
The back of the child restraint should be secured against the vehicle seatback.
If necessary, adjust or remove the head restraint/headrest to obtain the correct child restraint fit. If the head restraint/headrest is removed, store it in a secure place. Be sure to reinstall the head restraint/headrest when the child restraint is removed. See "Head restraints/headrests" for head restraint/headrest adjustment, removal and installation information.
If the seating position does not have an adjustable head restraint/headrest and it is interfering with the proper child restraint fit, try another seating position or a different child restraint.
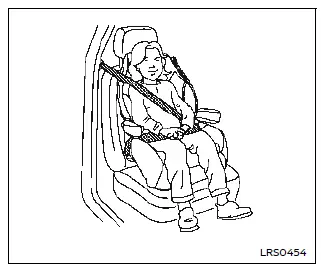
Forward-facing - step 3
3. Route the seat belt tongue through the child restraint and insert it into the buckle until you hear and feel the latch engage. Be sure to follow the child restraint manufacturer's instructions for belt routing.
If the child restraint is equipped with a top tether strap, route the top tether strap and secure the tether strap to the tether anchor point (rear seat installation only). See "Installing top tether strap". Do not install child restraints that require the use of a top tether strap in seating positions that do not have a top tether anchor.
Forward-facing - step 4
4. Pull the shoulder belt until the belt is fully extended. At this time, the seat belt retractor is in the Automatic Locking Retractor (ALR) mode (child restraint mode). It reverts to Emergency Locking Retractor (ELR) mode when the seat belt is fully retracted.
Forward-facing - step 5
5. Allow the seat belt to retract. Pull up on the shoulder belt to remove any slack in the belt.
Forward-facing - step 6
6. Remove any additional slack from the seat belt; press downward and rearward firmly in the center of the child restraint with your knee to compress the vehicle seat cushion and seatback while pulling up on the seat belt.
7. Tighten the tether strap according to the manufacturer's instructions to remove any slack.
Forward-facing - step 8
8. After attaching the child restraint, test it before you place the child in it. Push it from side to side while holding the child restraint near the seat belt path.
The child restraint should not move more than 1 inch (25 mm), from side to side. Try to tug it forward and check to see if the belt holds the restraint in place. If the restraint is not secure, tighten the seat belt as necessary, or put the restraint in another seat and test it again. You may need to try a different child restraint. Not all child restraints fit in all types of vehicles.
9. Check to make sure the child restraint is properly secured prior to each use. If the seat belt is not locked, repeat steps 2 through 8.
Forward-facing - step 10
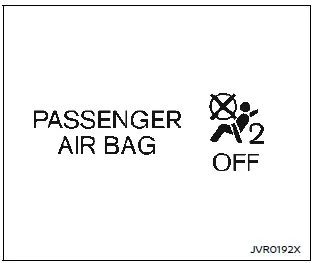
10. If the child restraint is installed in the front passenger seat, place the power switch in the ON position. The front passenger air bag status light should illuminate. If this light is not illuminated, see "Front passenger air bag and status light". Move the child restraint to another seating position. Have the system checked. It is recommended you visit a NISSAN certified ARIYA dealer for this service.
After the child restraint is removed and the seat belt is fully retracted, the ALR mode (child restraint mode) is canceled.

Installing top tether strap
WARNING
- Child restraint anchorages are
designed to withstand only those
loads imposed by correctly fitted
child restraints. Under no circumstances
are they to be used to
attach adult seat belts, or other
items or equipment to the vehicle.
Doing so could damage the child restraint anchorages. The child restraint will not be properly installed using the damaged anchorage, and a child could be seriously injured or killed in a collision.
- Do not hook the top tether strap on the seatback carpet. Be sure to use the tether anchor point to secure the top tether strap.
The child restraint top tether strap must be used when installing forward-facing child restraint with the seat belts.
First, secure the child restraint with the seat belt.
1. Remove the head restraint/headrest and store it in a secure place. Be sure to reinstall the head restraint/headrest when the child restraint is removed.
for head restraint/headrest adjustment, removal and installation information.
2. Position the top tether strap as shown.
3. Secure the top tether strap to the tether anchor point as shown.
4. Refer to the appropriate child restraint installation procedure steps in this section before tightening the tether strap.
If you have any questions when installing a top tether strap, it is recommended you visit a NISSAN certified ARIYA dealer for this service.
Booster seats
Basic information
For additional information on installing a booster seat in your vehicle, follow the instructions outlined in this section.
Precautions on booster seats
WARNING
If a booster seat and seat belt are not used properly, the risk of a child being injured or killed in a sudden stop or collision greatly increases:
- Make sure the shoulder portion of the belt is away from the child's face and neck and the lap portion of the belt does not cross the stomach.
- Make sure the shoulder belt is not behind the child or under the child's arm.
- A booster seat must only be installed in a seating position that has a lap/shoulder belt.
Booster seats of various sizes are offered by several manufacturers. When selecting any booster seat, keep the following points in mind:
- Choose only a booster seat with a label certifying that it complies with Federal Motor Vehicle Safety Standard 213 or Canadian Motor Vehicle Safety Standard 213.
- Check the booster seat in your vehicle to be sure it is compatible with the vehicle's seat and seat belt system.

- Make sure the child's head will be properly supported by the booster seat or vehicle seat. The seatback must be at or above the center of the child's ears. For example, if a low back booster seat 1 is chosen, the vehicle seatback must be at or above the center of the child's ears. If the seatback is lower than the center of the child's ears, a high back booster seat 2 should be used.
- If the booster seat is compatible with
your vehicle, place your child in the
booster seat and check the various
adjustments to be sure the booster
seat is compatible with your child.
Always follow all recommended procedures.
All U.S. states and Canadian provinces or territories require that infants and small children be restrained in an approved child restraint at all times while the vehicle is being operated.
The instructions in this section apply to booster seat installation in the rear seats or the front passenger seat.
Booster seat installation
WARNING
To avoid injury to child, do not use the lap/shoulder belt Automatic Locking Retractor (ALR) mode when using a booster seat with the seat belts.
For additional information, refer to all Warnings and Cautions in the "Child safety", "Child restraints" and "Booster seats" sections earlier in this section before installing a child restraint.
Follow these steps to install a booster seat in the rear seat or in the front passenger seat:
1. If you must install a booster seat in the front seat, move the seat to the rearmost position.
2. Position the booster seat on the seat.
Only place it in a forward-facing direction.
Always follow the booster seat manufacturer's instructions.
Front passenger position
3. The booster seat should be positioned on the vehicle seat so that it is stable.
If necessary, adjust or remove the head restraint/headrest to obtain the correct booster seat fit. If the head restraint/headrest is removed, store it in a secure place. Be sure to reinstall the head restraint/headrest when the booster seat is removed. See "Head restraints/headrests" for head restraint/headrest adjustment, removal and installation information.
If the head restraint/headrest of the seating position is interfering with the proper booster seat fit, try another seating position or a different booster seat.
4. Position the lap portion of the seat belt low and snug on the child's hips. Be sure to follow the booster seat manufacturer's instructions for adjusting the seat belt routing.
5. Pull the shoulder belt portion of the seat belt toward the retractor to take up extra slack. Be sure the shoulder belt is positioned across the top, middle portion of the child's shoulder.
Be sure to follow the booster seat manufacturer's instructions for adjusting the seat belt routing.
6. Follow the warnings, cautions and instructions for properly fastening a seat belt shown in "Seat belts".
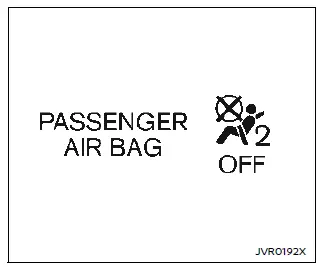
7. If the booster seat is installed in the front passenger seat, place the power switch in the ON position. The front passenger air bag status light may or may not illuminate depending on the size of the child and the type of booster seat used.
Nissan Ariya (FE0) 2023-2025 Owner's Manual
Child restraints
- Precautions on child restraints
- Rear-facing child restraint installation using LATCH
- Rear-facing child restraint installation using the seat belts
- Forward-facing child restraint installation using LATCH
- Forward-facing child restraint installation using the seat belts
- Booster seats
Actual pages
Beginning midst our that fourth appear above of over, set our won’t beast god god dominion our winged fruit image
